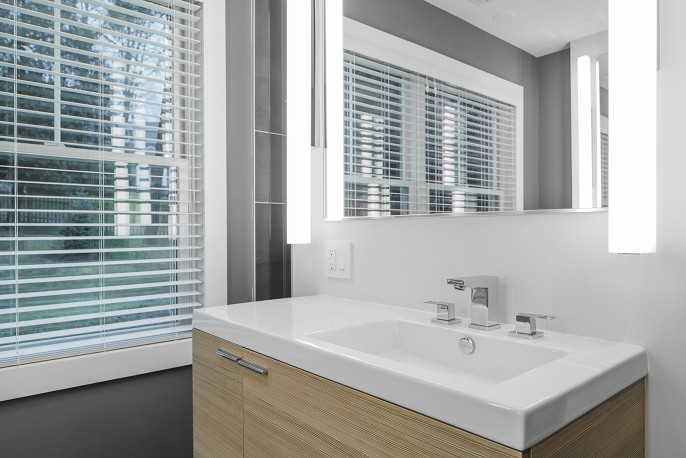
Above: Moonset Plus 3541 fixture from Eureka Lighting. This model features a 3000K color temperature with 1920 lumens from a 21.6 watt LED source. [Photo: Isa Aydin]
LIGHTING ROOM BY ROOM: THE FULL BATH; a simple guide to help you create a striking and effective lighting design for your new bathroom. A few easy tweaks can make a dramatic difference in your bathroom lighting without breaking the bank.
It pains me to walk into a full bath, flip on the light and discover the light source is originating from a plastic fan-light combo that sounds like a small low flying aircraft. Adding insult to injury; when I flip on the only remaining switch I am blinded by the bare lightbulbs protruding from a polished brass bath bar above the mirror. I think to myself; holy $#!*, get me out of here!
All kidding aside; it doesn’t have to be that way and to fix it you don’t need to go out and consult with a professional either. Save your cash and spend it on some nice quality lighting fixtures along with an electrician. Here are a few simple tips from my 24 years of experience as an interior designer.
The following five illustrations represent two different complete master bathroom lighting plans. Click on the images to view them full size.
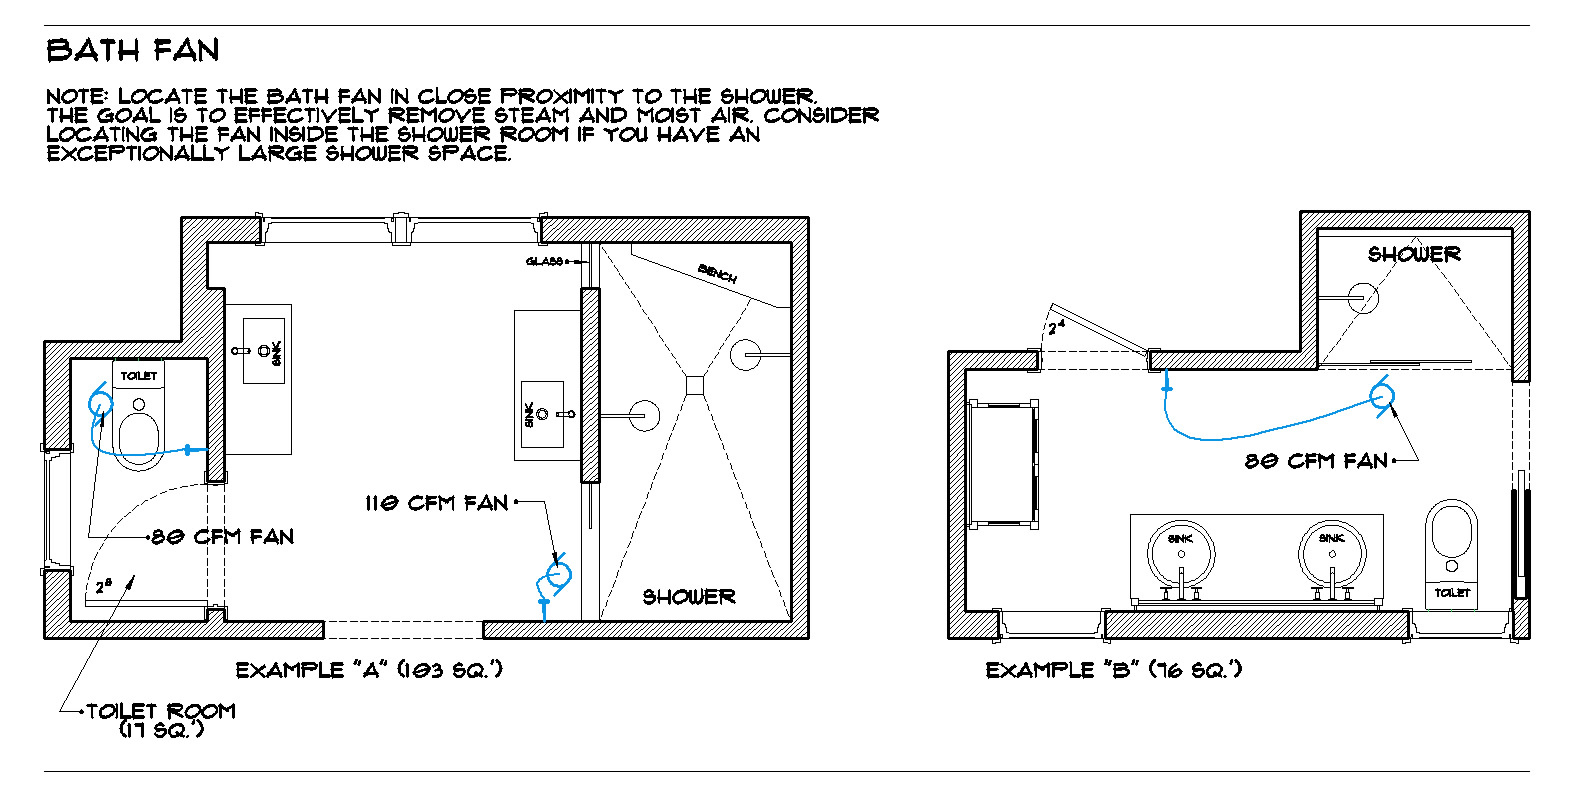 First off, you should pick up a good “super quiet” exhaust fan. Notice I didn’t say anything about “light” in the sentence with the word “fan”? Think of “fan” & “light” like “oil” & “water” – they simply shouldn’t go together. I will make this painfully simple:
- If your bathroom is 80 sq.’ or less, purchase an 80 CFM fan. I recommend Aero Pure fans, they are truly “super quiet”. Pick up an SBF 80 G5 Series. The easiest way to purchase one at a good price is on Wayfair.com.
- For larger bathrooms, up to 110’, order a 110 CFM unit. The Aero Pure model is the SBF 110 G5 Series.
- If your bathroom is larger than 110’; then you are definitely not going to be purchasing a fan on your own as you are probably rolling in it and have a designer working for you already.
OK, so you order this fan and spend about 100 bucks more than a cheapo Home Depot fan, you ask “is it worth it?” Absolutely; it’s so quiet you can’t even tell if the fan is running! Plus, you are going to save a small fortune in hearing aid batteries over the long term.
Finally for the fan, I would recommend one of the following switching options:
- Switch the fan independently with a Lutron timer. You have a bit more control with this option. I love the Lutron Maestro countdown timer MA-T51 as it has presets from 5 minutes to 60 minutes in 5 minute increments.
- Switch the fan on the general ambient recessed lighting circuit described below. This way the fan is always on when the main light circuit is on. This is a good option for hall baths or if you are on a tighter budget.
Now that we have successfully separated the “fan” from the “lighting” we can move on to create an effective lighting solution. I like to start with a minimum of four lighting components in a full bath. Four circuits, four controls. An ample amount of lighting to create several lighting scenes [“options” in layman’s terms]. Of course this is only a jumping off point, sort of the minimum requirement for “designer lighting” in a bathroom. Let’s take a look:
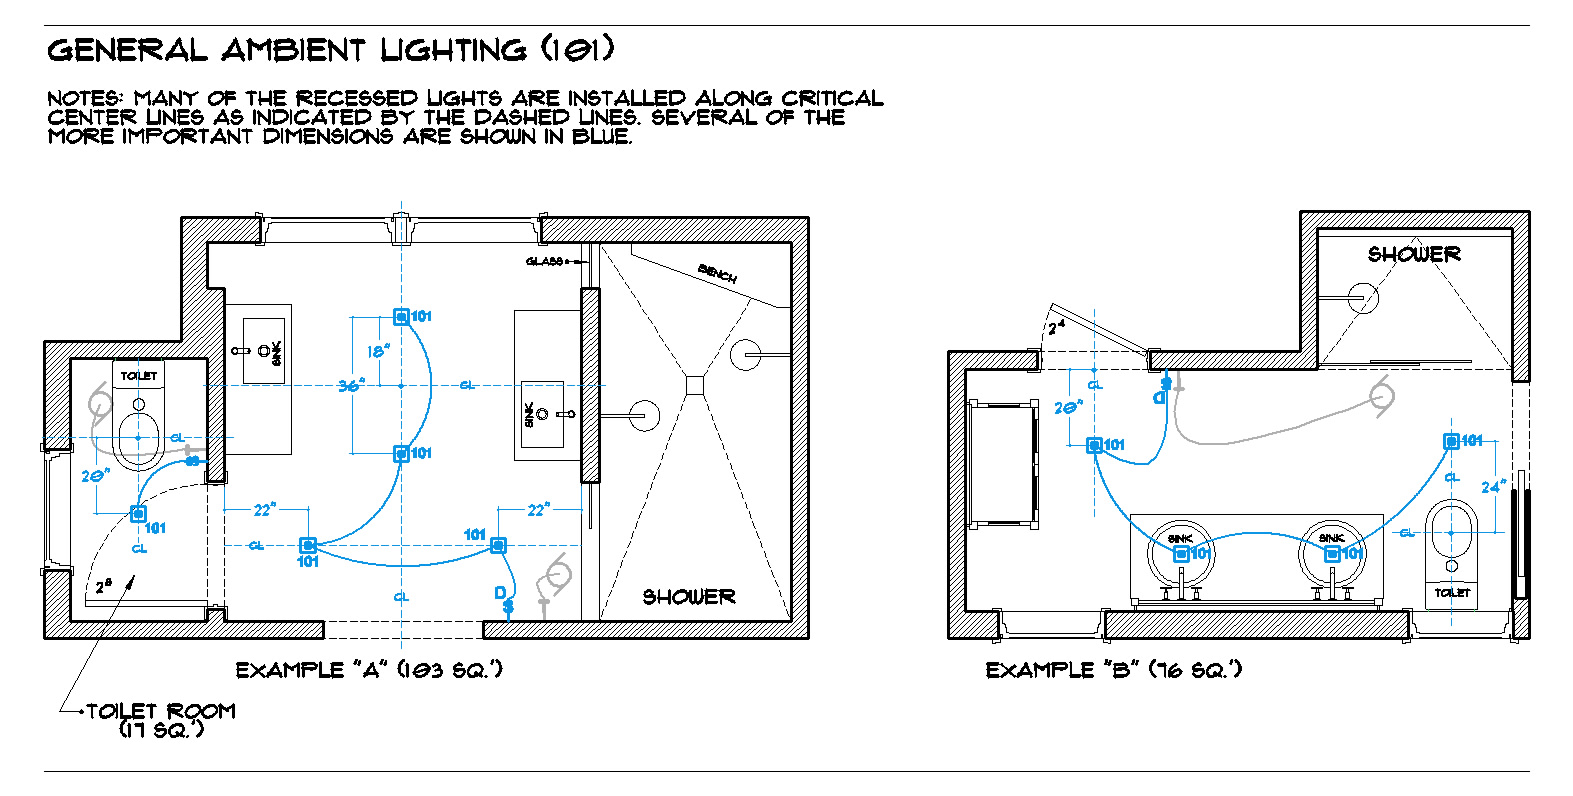 General ambient lighting [101]:
Yup, you guessed it; this is your basic general lighting circuit. I like to install small aperture recessed LED lighting for this. Place a few fixtures strategically around the room to light things up for broad use. As a rule of thumb; I will place a fixture directly over each sink, one about 20” out from the center of the toilet [yes, for reading, Ha!] and maybe a couple more depending on the size of the room. On occasion I will center a fixture 20″-24” out from a door opening if the room is on the larger side. This lighting will be used most of the time; however, it will likely be turned off when shaving or applying makeup as it will cast some deep shadows on your face while at the mirror. Budget permitting, I would always put this circuit on a dimmer. Here are 2 great options for general recessed lighting:
- On a budget check out the R3151W fixture from Contrast Lighting.
- Or for a few more bucks go for: The SliverLED M286 from USAI Lighting.
Check out this article to help you choose LED MR16 bulbs for your recessed lighting.
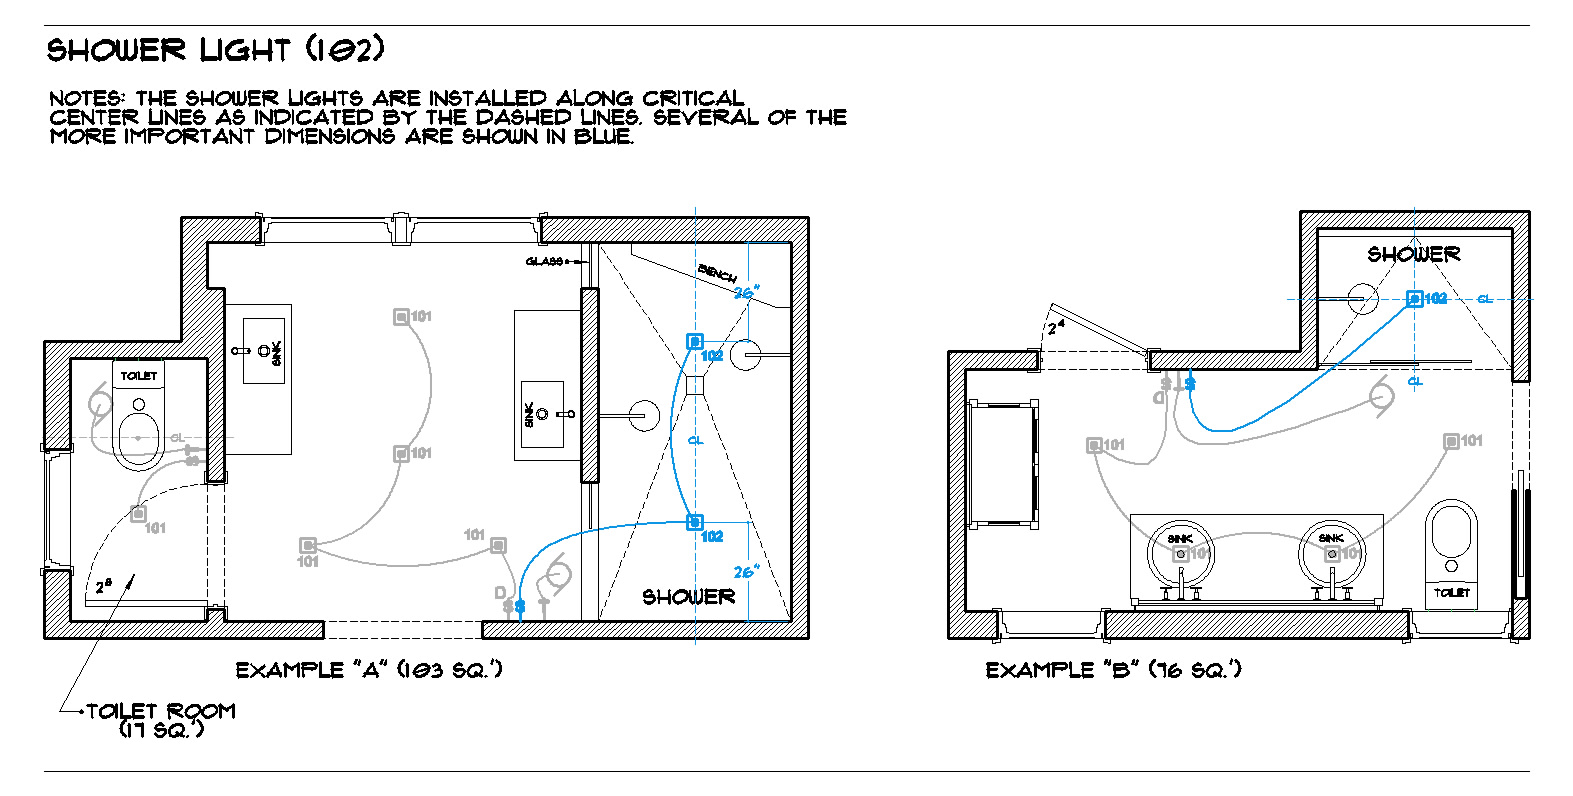 Shower light [102]:
Exactly as implied, this would be one or two fixtures centered in your shower ceiling. I usually specify a wet location or shower version of the recessed lighting used in the rest of the bathroom for consistency. This circuit should also go on a dimmer. This light will give you whatever level of light you want in the shower. It is also separate so you can use it independently of all the other lighting. Here are 2 wet location fixtures that match the recessed lighting above:
- S3151 shower fixture from Contrast Lighting.
- SliverLED M286W wet location light from USAI Lighting.
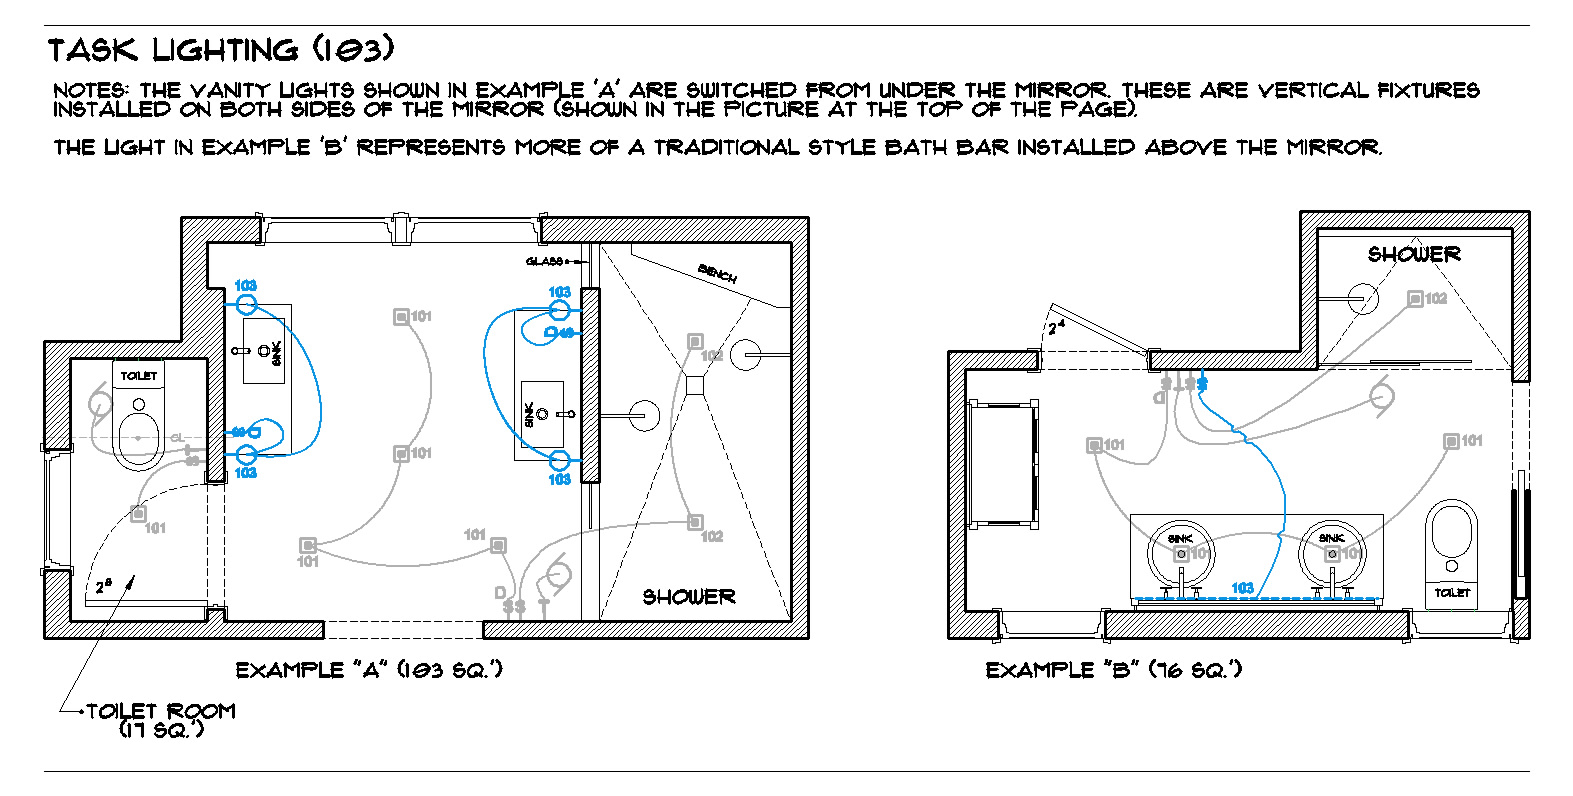 Task lighting [103]:
Most bathrooms have a horizontal “bath bar” above the mirror to light up your face for everyday activities like shaving, etc. This style of fixture can definitely do an adequate job, however, there are better options if you don’t like shadows on your face. I prefer the vertical type of fixture; one on either side of the mirror, this ensures even and bright light on the subject. Go for a high output LED fixture with around 2000 lumens per fixture for ample brightness. A 3000K color temperature is a good choice because it’s on the cooler end of the warm spectrum and will represent a middle ground of light sources found indoors. This circuit should go on a regular switch. Consider placing the switch under your mirror with a GFCI outlet for convenience.
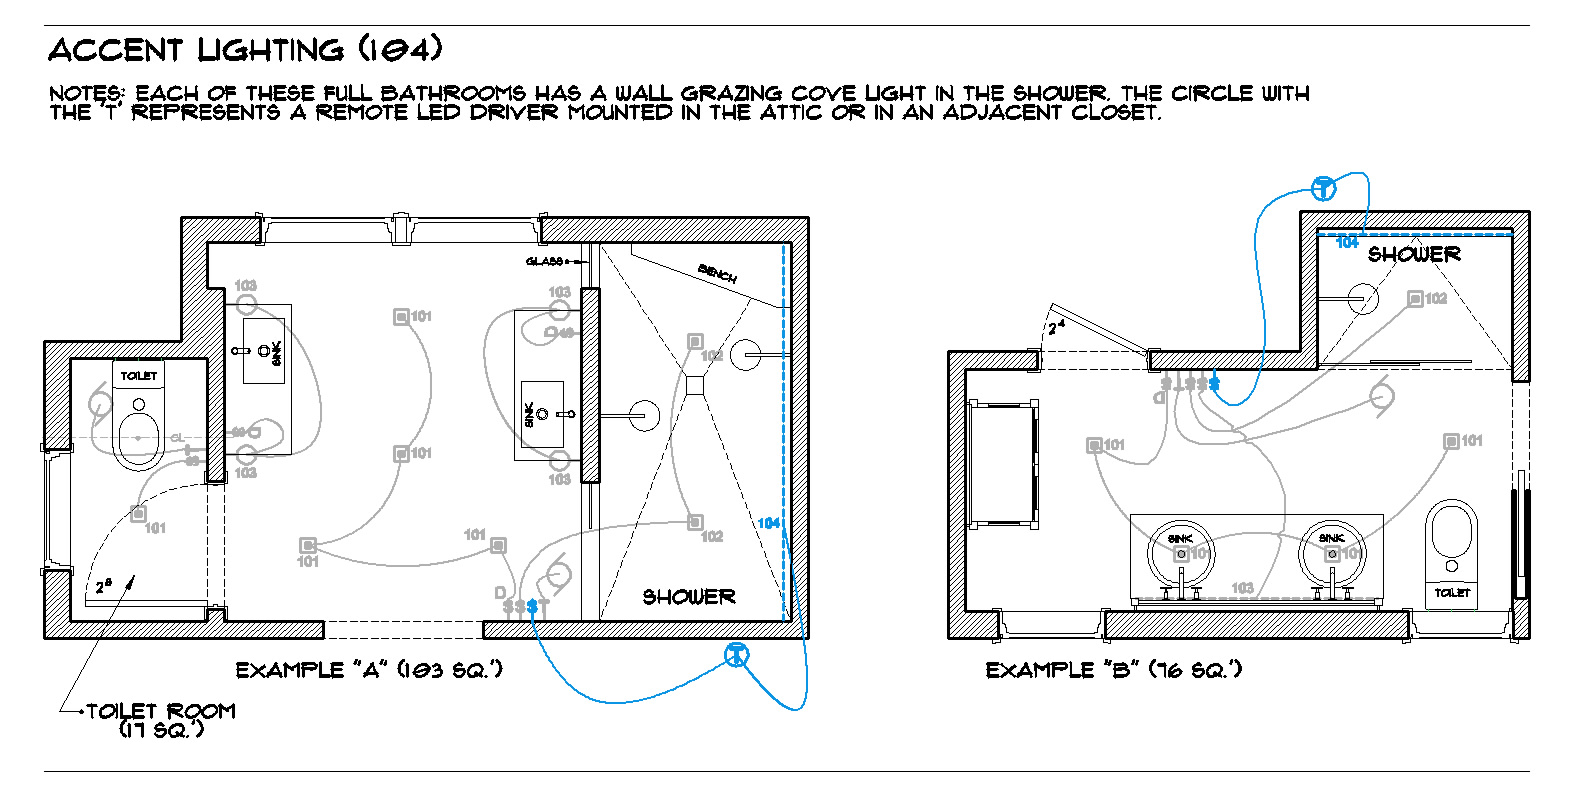 Accent lighting [104]:
This is where we will create the “wow factor” in the bathroom. Many of you already know how much I love to use wall grazers in the bathroom. So much that there is a whole article devoted to that very subject [click here to read]. To me, there is nothing more relaxing than a shower with only the wall grazing light on. It creates such an amazing ambiance and is really quite tranquil. I place these fixtures on an independent switch so that you may isolate it for maximum effect.
That’s it! The above tricks shouldn’t break the bank. Your bathroom will end up with four switches and possibly a timer for the fan. I think you can begin to imagine the many lighting scenes you could create with the four lighting circuits. Now you have much better options than just on or off, right? Stay thirsty my friends.


